
In this topic, we discuss, how to set up a new spring boot project and how to run this in the server and how to generate war in command prompt. Here we use STS(Spring tool suite) to build the project. We can also build through Eclipse IDE. For build project, through the eclipse, we need to install external plugins from eclipse market place. We discuss all this in detail but for now, firstly using Spring tool suite let's start building our project. So without wasting any time let's begin.
REQUIERMENTS:
1.STS or Eclipse IDE with Spring tools plug-in
2.Jdk -8 or higher
3.Maven 3 or higher
2.Jdk -8 or higher
3.Maven 3 or higher
STEP BY STEP PROCESS:
1.Open The Spring tool suite:

2.Select a work directory where you want to build your project:

3.Step up the project name:

-Set the project name.
-Set the packaging as war because we build a web based application.
-Set groupId(Group Id is the unique identification of your project among all project.It's like your project domain name.for ex:-com.demo,example.test etc etc) and artifactId(Artifact Id is your packaging name.if you create the jar or war,artifact Id is our default packaging name).
-Set your project config file package name at last and click with next.
4.Select the built-in dependencies:

-Choose your spring boot version(by default selected latest version,and we prefer latest version but it's your choice.)
-Here we just create a simple web base project so we just set web is default dependency and press next and finish.
5.Finishing the set up.
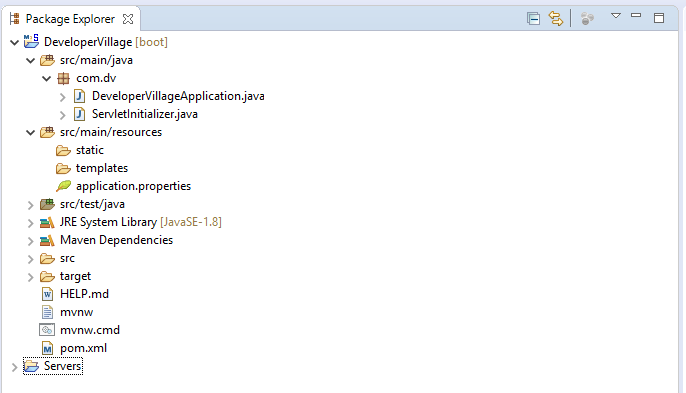
-It's take some time to build because maven download the dependencies from maven repository. After download the dependencies,by default project file structure format as shown as above image.
-DeveloperVillageAppllication.java is contain the main method of spring boot application and it's the entry point of project.
-ServletInitializer.java is the configuration file of DispatcherServlet of web application.
Pom.xml
<?xml version="1.0" encoding="UTF-8"?>
<project xmlns="http://maven.apache.org/POM/4.0.0" xmlns:xsi="http://www.w3.org/2001/XMLSchema-instance"
xsi:schemaLocation="http://maven.apache.org/POM/4.0.0 http://maven.apache.org/xsd/maven-4.0.0.xsd">
<modelVersion>4.0.0</modelVersion>
<parent>
<groupId>org.springframework.boot</groupId>
<artifactId>spring-boot-starter-parent</artifactId>
<version>2.1.5.RELEASE</version>
<relativePath/> <!-- lookup parent from repository -->
</parent>
<groupId>com.dv</groupId>
<artifactId>DeveloperVillage</artifactId>
<version>0.0.1-SNAPSHOT</version>
<packaging>war</packaging>
<name>DeveloperVillage</name>
<description>Demo Developer Village project in Spring Boot</description>
<properties>
<java.version>1.8</java.version>
</properties>
<dependencies>
<dependency>
<groupId>org.springframework.boot</groupId>
<artifactId>spring-boot-starter-web</artifactId>
</dependency>
<dependency>
<groupId>org.springframework.boot</groupId>
<artifactId>spring-boot-starter-tomcat</artifactId>
<scope>provided</scope>
</dependency>
<dependency>
<groupId>org.springframework.boot</groupId>
<artifactId>spring-boot-starter-test</artifactId>
<scope>test</scope>
</dependency>
</dependencies>
<build>
<plugins>
<plugin>
<groupId>org.springframework.boot</groupId>
<artifactId>spring-boot-maven-plugin</artifactId>
</plugin>
</plugins>
</build>
</project>
DeveloperVillageAppllication.java
package com.dv;
import org.springframework.boot.SpringApplication;
import org.springframework.boot.autoconfigure.SpringBootApplication;
@SpringBootApplication
public class DeveloperVillageApplication {
public static void main(String[] args) {
SpringApplication.run(DeveloperVillageApplication.class, args);
printOutput();
}
public static void printOutput() {
System.out.println("Welcome to Developer Village.Keep touch with us.");
}
}
6.Run the project:

7.See the output:

8.Generate war of project in cmd:
Move to project directory and open command prompt and run this command mvn clean install .

-After run this command in cmd it take some time to package the dependencies with your project and genreate the war in location "Project Parent directory\target.
-for example:
D:\My Work\Blog\Developer Village\Workspace\DeveloperVillage\target
path contain our war file.
For now this is how to build single module spring boot project with maven and in our next topic we discuss how to set up multi module maven project with spring boot stay tune with us be happy,do what you like, and bye.
Comments
Post a Comment